Back to: Edging Single Vision
Note: If your edger is set to “AUTO” and has no reason to run a job on “MANUAL” then you would simply block a SV lens directly on its OC with the three red dots horizontal in the blocker.
Formulas for Single Vision Lens Finishing
Note: Frame PDs or the geometric centers of the eyewire openings are almost always wider apart than patient PDs are. This means that lenses are usually “decentered” “IN” or nasally.
BUT THIS IS NOT ALWAYS THE CASE SO BE CAREFUL!

Decentration for binocular PD’s:
A + DBL = Frame PD or FPD = Distance Between Centers (of eyewire opening) DBC
FPD minus the Patient Binocular PD/2 = Amount of decentration per eye
Example:
Frame PD = 72
Patient binocular PD of 64
72 – 64 = 8 / 2 = 4 mm per eye
Since the patient PD is LESS than the frame PD (64 is less than 72) the lenses need to be moved IN 4mm per eye.
Decentration for monocular PD’s:
FPD / 2 = Monocular Frame PD (MFPD)
MPPD = Monocular Patient PD
MFPD – MPPD = Amount of decentration per eye
Example:
Frame PD = 72
Monocular Patient PD = 32/34
72 / 2 = 36
36 – 32 = 4mm in right eye
36 – 34 = 2mm in left eye
Since the patient PDs are both LESS than the frame PD the lenses need to be moved IN.
For “IN” decentration
Right Lenses Are Shifted Right
Left Lenses Are Shifted Left
Since the lenses are blocked on the front you shift a right lens right and a left lens left to shift the lens OC in towards the nose. Once you have placed a block on the lens you can pick it up, hold it like you would be wearing it, and you will see that the lens OC has shifted nasally.
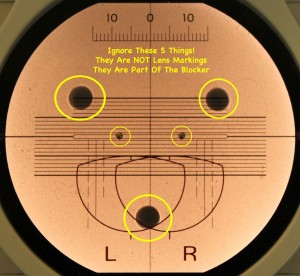
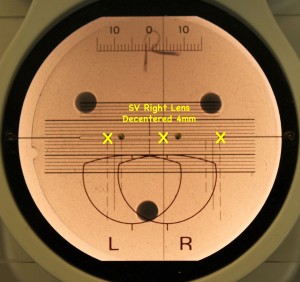
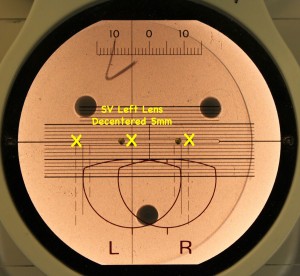
In all of the following images the X X X represents the three dots that the lensmeter places on the lens. The center X is the lens OC and the two outer X are how you keep a lens properly oriented for axis (if your Rx calls for one).
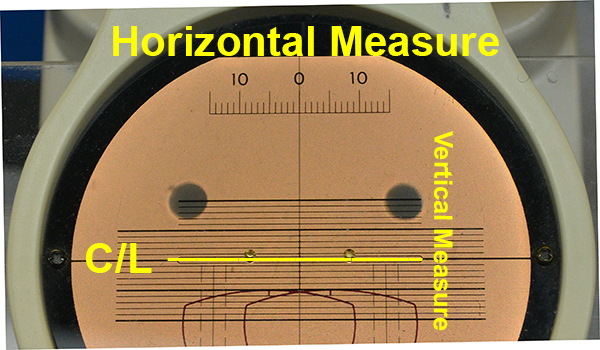
In the examples further below the lenses are in a manual blocker. Look for the millimeter scale for both vertical and horizontal movement. Horizontal movement is numbered in the scale along the top. For vertical movement you need to count the number of lines above or below the center. On this blocker you can adjust the line to mark horizontal movement.
C/L means Center Line.
Notice that every 5mm the line is a little darker than the others.
Where the “0” line and the C/L line meet is your starting point. In theory it is equal to the center of your eyewire opening.


For the following examples these are two minus lenses. Where the two prisms meet is the lens optical center or OC. It is our goal to place the OC directly in front of the patients pupil. We do this by decentering (moving) the lenses within the frame eyewire opening. We use the patient PD and the frame PD to figure out how much to move them and in what direction.
Below is an example of lay-out calculations for a job order providing a binocular patient PD of 64.

To have the lens OCs end up 64mm apart we will need to shift the lens OC over 3mm in each eye.
We do this in the lens blocking device, or even by hand.
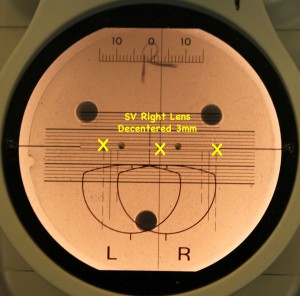
Once I have the lenses in this position I would load the blocker with a block (with a sticky “leap pad” attached) and stick the block to the front of the lens.
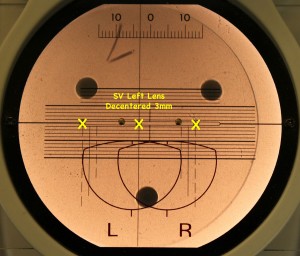
Below is an example of the layout calculations required for a job where the patient PDs have been given monocular.
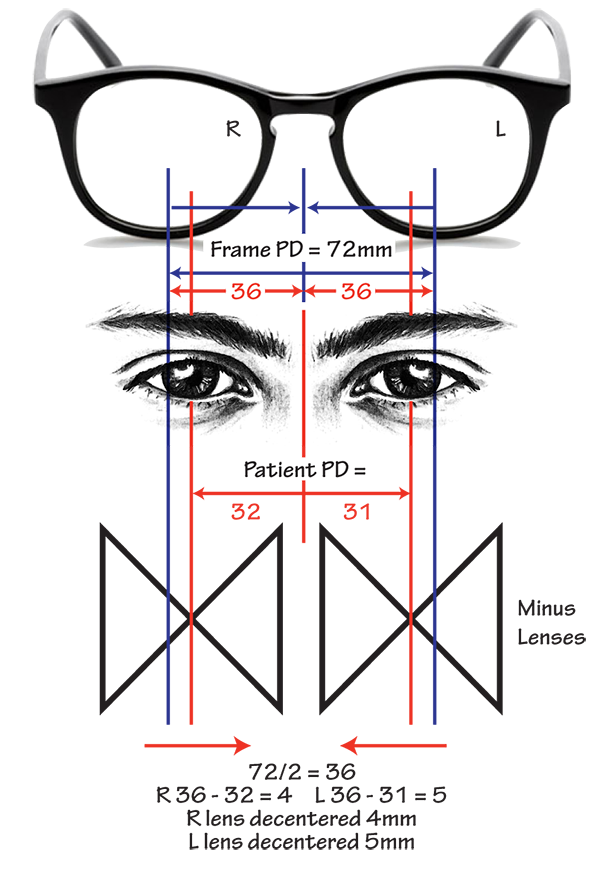
We need to shift the right lens 4mm and the left lens 5mm to place the lens OCs at the proper location.
Once I have the lenses in this position I would load the blocker with a block (with a sticky “leap pad” attached) and stick the block to the front of the lens.
Here is the answer key to the Single Vision Finished Uncut Lens Inventory Worksheet: C, A, E, D, B
Working with prism in SV lenses is covered in the prism section. Prism in lined multifocals and progressives is quite easy.