Back to: 7: Finishing: The Optician’s Edge
Here are some things to consider before you ever think of hitting the START button on that first job…
If you are new to finishing, do not be alarmed when you get your first few surfaced, un-cut jobs back from the lab.
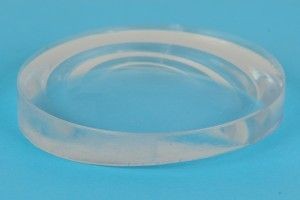
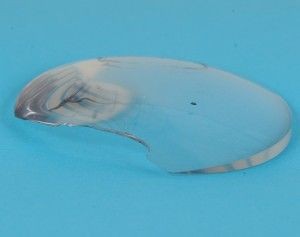
An edger can handle very high lens powers.
As shown on the left, a high minus lens may have an edge thickness of a full centimeter or even more!
As shown on the right a high plus lens may well appear cracked or broken but will cut out just fine.
SO DON’T PANIC!
Lens Materials
Know that each lens material will act differently when being edged. A material like CR-39 may cycle in just 2 minutes start – to – finish while a high-index may take 5. Some materials sing, some smoke, some smell (kind of like your workmates).
Note To Your Future Self: This won’t make any sense now, but it might some day, and I really can’t think of anywhere else to mention it. When edging for a snap-in or pinch style Rx insert for a mask or sport frames, remember that the lens will actually be rotated a few degrees in the mounted position. If you have a lens with higher cylinder, a progressive, or a lined bifocal, you need to trace the insert while mounted in the frame – or – account for the rotation. I did a lot of Rudy Project, so I had an old damaged frame I kept around that I had trimmed down to fit well in the tracing unit. That way, when the insert was rotated out to snap in place things lined up like they should.
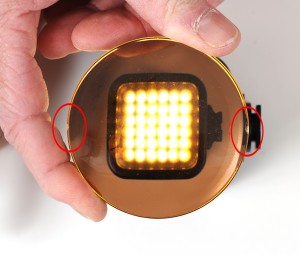
Marks are placed at the 180 line and should be oriented the same within the eyewire.
Failing to keep both lenses aligned in the proper way will cause distortion for the wearer.
In this photo, in the red circles, you can just see where this lens has two cut outs to indicate the 180 degree line. Other lenses may have the temporary painted lines like progressives. If in doubt, you MUST call the lab and find out the proper procedure for the lens type you have.
Any surfaced polarized lens with cylinder power above 0.75 you will assume orientation is correct when the lens is rotated to be on axis.
If you should get a pair that are unmarked: Put on some plano polarized sunglasses off the rack. Hold the lens up and against a good light source. Rotate the lens until you CAN’T see through it. Make a mark at the very top and bottom of the lens in that position. Those marks (you made at 90 degrees) become your 180 marks for finishing layout work. In other words those marks will be rotated 90 degrees from vertical to horizontal.
Rules for Finishing:
BE NEAT
Work so that someone else could come in and complete the job you have begun.
Always work Right lens first
Always mark lenses with a grease pencil or AR pen R for right and L for left. (For finishing these are on the front of the lens facing you.)
Always keep the Right lens on right and the Left lens on the left in the work tray
Always do the same steps in the same order and always do things the same exact way. You will be surprised the mistakes you will catch BEFORE you cut the lens wrong if you are consistent. This means even the little things like always placing the “tongue” of the leap pad on the block in the same direction every time.
The more consistent you are in your finishing work the more likely you will be to catch a mistake before you edge the lens.
Don’t say I didn’t warn you!
DON’T BE FOOLISH: If you have a customer’s old pair of glasses in hand while making a new pair then clean them up, tighten the screws, align them, slip on some new temple ends, put on some new nose pads — give them a nice refurb, put them in a fresh case with a lens cloth. Mention what you did when handing them back, show them what you did. It is something that sets you apart and certainly not something a customer expects. BE DIFFERENT!
Definition of finishing for jobs that do not require prism:
The art and science of placing the lens optical center (OC) directly in front of the customer’s visual axis to fill the prescription as written by the doctor.
Definition of finishing for jobs that do require prism:
The art and science of placing the lens major reference point (MRP) in the proper place to fill the prescription as written by the doctor. (More on working with SV lenses and prism in the prism lesson)
Calculations for single vision lenses work from the OC, for lined muti-focals from the top and center of the segment, and for progressives from the fitting cross.


Unless an OC height is given (or you are creating wanted prism in a lens) single vision lenses are only shifted along the 180 degree line or right and left. If an OC height is given, then the lens will also be moved along the 90 degree or up and down.
Regardless of the type, edgers calculate all measurements from the exact center of the eyewire opening. The edger assumes that the block that holds the lens in place for finishing is affixed to the lens in the proper position. In a pattern edger the edger assumes that the center of the pattern will correspond to the center of the eyewire opening. In a patternless edger it will assume that the center of the block and the center of the chuck will correspond with the center of the eyewire opening.

Although exaggerated this illustration is the best way to think about a frame when doing lay-out work. EVERY calculation works from the center of the red X.
Do I need to move my lens OC, segment or fitting cross in from the center of the X towards the nose?
Away from the center of the X towards the temple?
Do I need to move my OC up and in?
Do I need to move it out and down?
The blue line represents 1/2 the B measurment and we use that for OC heights, segment heights and fitting heights.
Here is a video review of The Boxing System: